At Particular we support a bunch of different technologies, so it seems there’s no end to the infrastructure software I might have to use on any given day. SQL Server, RabbitMQ, MongoDB, MySQL, PostgreSQL, MariaDB, even (shudder) Oracle.
I don’t want all that crap installed on my machine. In fact, I don’t want to install infrastructure on my machine again, like…ever.
So when I needed to work with a RavenDB cluster, I Dockerized it, and here’s how I did it. Maybe it’s not perfect, maybe it could be better? If you think so, let me know! I feel like I stumbled through this, but the result appears to work well.
Docker networking is fun
NOTE:: It’s helpful to know that I run Windows on macOS with Parallels, and that my Windows host file contains a
hostosentry that is always addressable to the Mac, so I can use that like alocalhostexcept it’s locahost on macOS, not on the Windows virtual machine. I hope to blog more about this in the near future.
When dealing with Docker and networking, it seems if you’re not already a network engineer (which I am not) you’re already at a bit of a disadvantage.
There are two pretty easy modes of operation:
- If you declare mapped ports, you can talk to the application on those ports on localhost without much fuss.
- If you give the containers names, the containers can talk to each other using those names.
In either case, all the Docker stuff gets its own little island, and you have very defined bridges (the exposed ports) onto that island.
But a RavenDB cluster has a few different wrinkles. One RavenDB server will normally communicate on port 8080 (HTTP) and port 38888 (TCP), and need to communicate both externally and amongst themselves, but you can’t use the same address for both. This becomes a problem when the Raven cluster gives its internal addresses to the client, which then wants to verify that they’re all alive and can’t even find an address.
Let me give an example. If you create containers named raven1, raven2, and raven3 and set them up as a cluster, raven1 can see and talk to raven2 and raven3, but then reports those names to the client, in this case code running in Visual Studio, and the Windows environment has no idea how to resolve raven1.
The Raven team knew this (they are much better at network engineering than me) and provided configuration options to deal with it by providing environment variables:
RAVEN_ServerUrl- The internal port 8080 address. This is alwayshttp://0.0.0.0:8080, the 0s mean that it can respond on any host name you throw at it. It’s always port 8080 because this is local to the container - nothing else will be vying for this.RAVEN_ServerUrl_Tcp- Same deal but for the TCP port. Alwaystcp://0.0.0.0:38888.RAVEN_PublicServerUrl- This is the external address for the 8080 address, or in other words, how you’d get onto the Docker island. Here I provide one of the following, one for each node:http://hostos:8080http://hostos:8081http://hostos:8082
RAVEN_PublicServerUrl_Tcp- Same deal but for TCP. Either:tcp://hostos:38888tcp://hostos:38889tcp://hostos:38890
With this setup of public/private URLs, Raven reports its server topology using the public URLs, which my code is able to look up, and everything just works.
Docker compose
So given the networking aspects above, running docker-compose up --detach with the contents below in docker-compose.yml ramps up the 3 server nodes:
1 | version: '3' |
Just a few other notes:
extra_hostsdefines my macOS host entry on each of the Docker containers as well. Essentially this gives network traffic a way to get off the Docker island and then return.- There are extra environment variables that make sure I don’t have to go through a lot of Raven setup mumbo-jumbo on each server node. You can look up exactly what they do in the RavenDB documentation.
Setting up the cluster
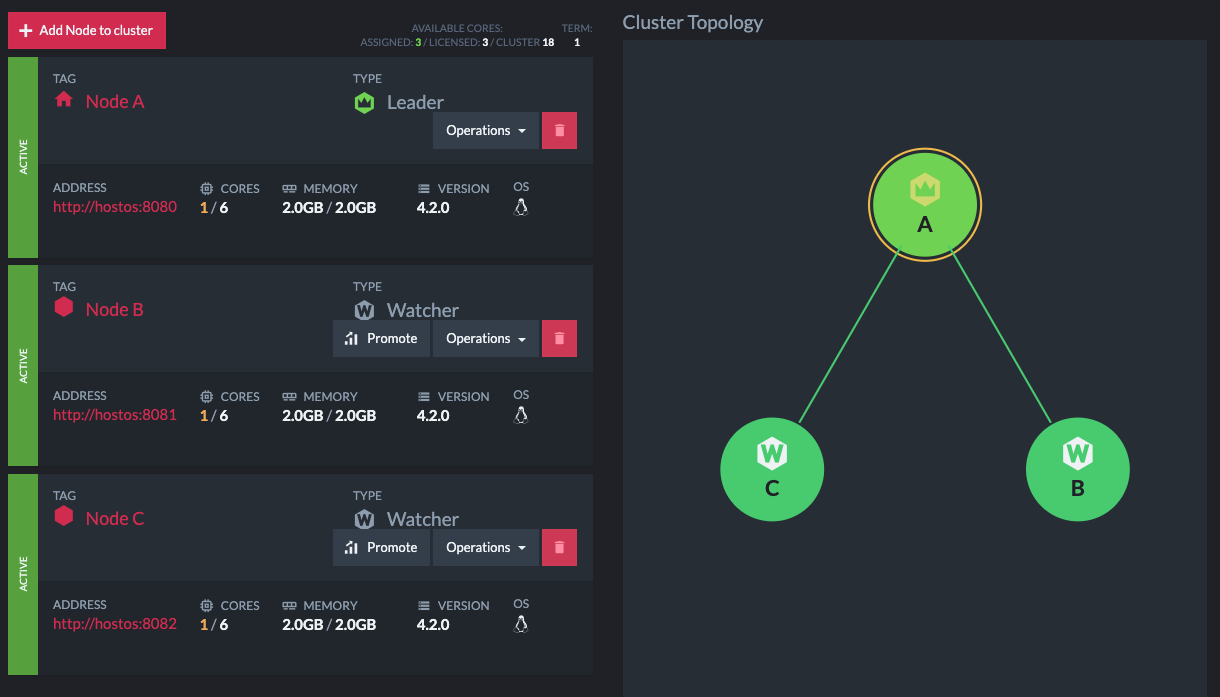
Running docker-compose only gets you so far. When it’s complete you get 3 Raven nodes that aren’t connected in any way, and don’t even have a license applied. In order to set up a cluster you must have a license, and it must be applied only to the node you intend to be the leader. The remaining nodes are then joined to the already-licensed leader and are allotted a number of assigned cores from the license’s maximum limit. Because a (free) development license allows up to 3 cores, that’s 1 core per node.
So I actually have a bash script (remember I’m on a Mac) that runs docker-compose and then executes a series of curl commands to configure the cluster.
First, I apply the license to raven1. This is back to using localhost becuase I execute it on the Mac:
1 | echo "Applying licenses..." |
You’ll need to provide your own LICENSE_JSON stripped of any prettified whitespace. However instead of copying my script and trying to do this manually, the easiest way is to do it using RavenDB Studio in Chrome, while watching with Chrome developer tools. On the Network tab, you can take any request, right-click, and get a bunch of options. On Windows, you can copy a request as PowerShell or cURL.

So pick your scripting poison, and then just remove any irrelevant headers. The RavenDB server doesn’t really care what your user agent is.
Next I want to tell raven1, the cluster leader, that it only gets to use 1 core, in order to leave 2 cores remaining for the rest of the cluster:
1 | echo "Assigning 1 core for leader node..." |
And lastly, I want to join raven2 and raven3 to the cluster as watcher nodes, allotting only 1 assigned core for each. Again, I discovered these URLs using the Chrome network tools. Note that the url-encoded url parameter uses hostos as the host. I don’t know why but using raven2 and raven3 didn’t work for me. This is also why my compose file needed to specify the extra_hosts parameter:
1 | echo "Adding raven2 to the cluster..." |
So putting it all together, assuming Docker is already running on my Mac, here is the script that launches my cluster for me:
1 | echo "Running docker-compose up" |
The result is this in the Cluster view in Raven Studio: A 3-node cluster with one Leader node and two Watcher nodes:
Summary
So that’s how you create a 3-node RavenDB cluster in Docker containers. Hopefully it will be useful to somebody. Probably that somebody will be me 6 months from now when I google it and find this post.
By no means do I find this perfect. If you can do better, please use the Edit button at the top of this post and send me a PR!